
Moving a WordPress site to a new host without downtime comes down to one rule. Never take the old server offline until the new one is already serving the same site correctly. You build a full copy on the new host and test it privately through your hosts file. You lower the DNS TTL a day in advance, then flip one A record. Done this way, the switch is invisible to visitors.
This guide is the full sequence, with the commands, the failure modes and a rollback that takes about 5 minutes.
What “no downtime” actually means
There is no moment when DNS updates everywhere at once. During the cutover, some resolvers still hold the old IP address and some already have the new one. Both servers receive traffic for a while. That window is fine as long as both servers answer correctly. It is only a problem if the old one has been deleted, or if the two copies drift apart because somebody published a post mid-move.
So the target is not “instant”. The target is that every request gets a working page from one of two identical copies. Nothing is written to the copy you are about to abandon. Two rules follow from that. Keep the old hosting account paid and running for 7 to 14 days after the move. And freeze content, orders and comments for the length of the cutover, typically 30 to 60 minutes.
If your site takes orders continuously, schedule the cutover for your lowest-traffic hour. Put the store in maintenance mode for that window. An hour of “back in a moment” beats a day of missing orders.
Pre-flight: what to collect before you start
Write these down in one file before touching anything. You need SSH or FTP credentials for both hosts, and the database name, user and host for both. You need the current DNS records (A, AAAA, CNAME, MX, TXT with SPF and DKIM) and their TTL values. Add the registrar login, the WordPress admin login, and the PHP version the site currently runs.
Check your current DNS with our DNS lookup tool and save the output. The most common post-migration disaster is not the website at all. It is email, because MX and SPF records were never part of the plan. If your mail is hosted at the old provider, decide now whether it moves too or stays.
Also check your disk and bandwidth needs before you pick a destination plan, so you are not migrating twice. Our note on how much disk space and bandwidth you need covers the sizing. The WordPress hosting list shows plans that run it well. For a bigger site, compare VPS plans instead of shared.
Step 1. Match the new host to WordPress requirements
Do this before you pay. WordPress.org currently recommends PHP 8.3 or greater, MariaDB 10.11 or greater or MySQL 8.0 or greater, and HTTPS support. It also notes that WordPress still works with PHP 7.4+ and MySQL 5.5.5+. Those versions are past end of life, and they carry known security exposure.
Version support moves quickly. According to php.net’s release schedule, PHP 8.2 leaves security support on Dec 31, 2026. PHP 8.3 is covered until Dec 31, 2027, and PHP 8.4 leaves active support on Dec 31, 2026. Landing on a host that caps you at PHP 8.1 buys you a second migration within a year.
Confirm the new host gives you SSH, WP-CLI or at least phpMyAdmin. You also want an SSL certificate (Let’s Encrypt via AutoSSL is standard on cPanel hosts) and a way to run real cron jobs. On the plans we track, entry-level shared hosting that meets this starts around $2.99/mo at Hostinger, renewing at $10.99/mo. It is $4.79/mo at InMotion Hosting, renewing at $14.99/mo, and $3.99/mo at Bluehost, renewing at $9.99/mo. All figures are as of September 2026 and were checked Sep 17, 2026.
InMotion Hosting and Web Hosting Hub both offer a 90-day money-back window on shared plans. That is unusually generous cover for a migration that goes wrong. Most of the directory offers 30 days.
Step 2. Lower the DNS TTL a day before the move
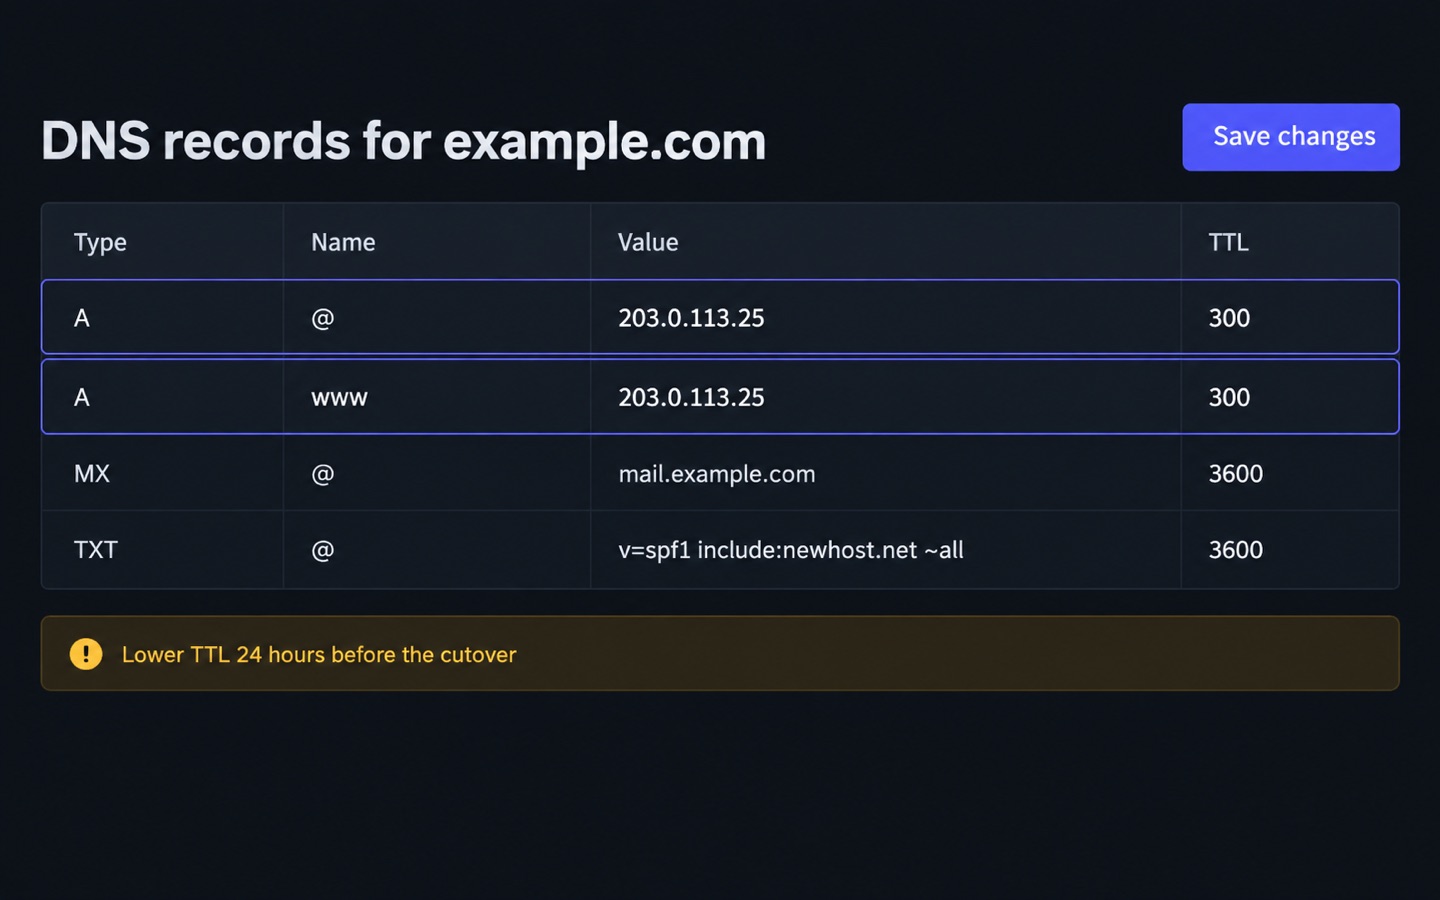
TTL stands for time to live. It is how long other resolvers are allowed to cache your record. If your A record has a TTL of 86400 seconds, a change can take up to 24 hours to be seen everywhere. Lower it to 300 seconds at least one full old-TTL period before the cutover. The tail then shrinks to about 5 minutes.
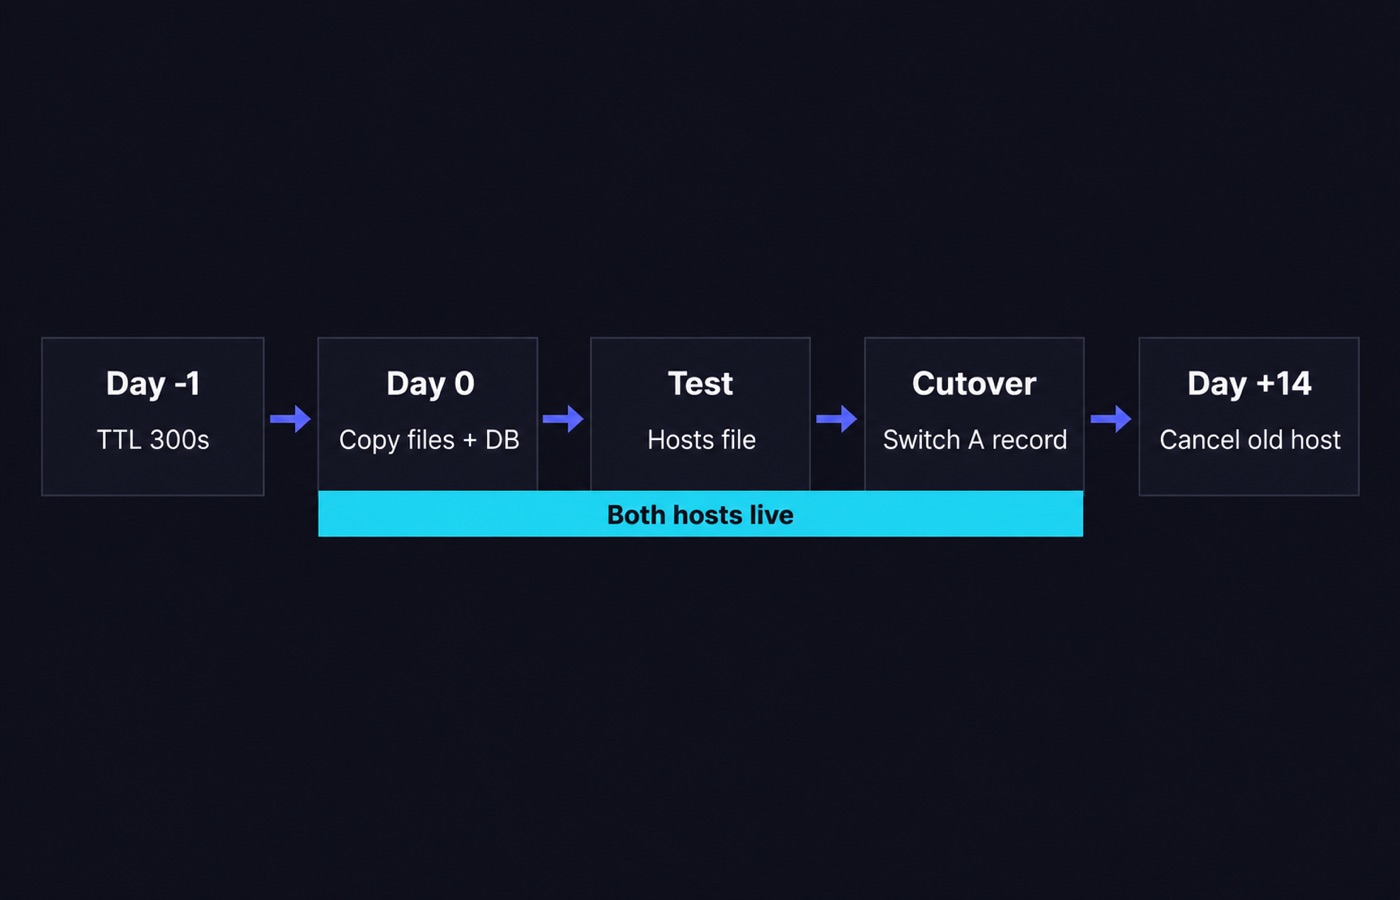
This is long-standing DNS practice, not a trick. RFC 1912 states that if you plan to make major changes, it is a good idea to turn the TTL value down beforehand. You then wait the previous minimum value, make your changes, verify their correctness, and turn the value back up afterwards.
# Check the current TTL (the number before "IN A")
dig example.com A +noall +answer @8.8.8.8

# example.com.  86400  IN  A  198.51.100.10
#               ^^^^^ lower this to 300 in your DNS panel, then wait 24 h
Change the TTL wherever your DNS is run: the registrar, the old host, or a DNS provider. If your domain uses custom nameservers at the registrar, see our walkthrough on creating a private nameserver at GoDaddy. That way you change the record in the right place. Raise the TTL back to 3600 seconds or more a few days after the move.
Step 3. Back up files and the database
Take the backup from the old server even if you plan to use a migration plugin. The plugin is the part that might fail. The WordPress handbook is explicit that a database export alone is not a site backup. Themes, plugins, uploads and wp-config.php live in the filesystem, and they must be copied too.
# On the OLD server, from the WordPress root directory
cd /home/olduser/public_html

wp core version
wp db export ~/migrate/db-$(date +%F).sql --add-drop-table

tar -czf ~/migrate/files-$(date +%F).tar.gz
    --exclude='wp-content/cache'
    --exclude='wp-content/uploads/backups' .

ls -lh ~/migrate/
The --add-drop-table flag adds a DROP TABLE IF EXISTS before each CREATE TABLE. That makes the import repeatable if you have to run it twice. If you have no SSH access, cPanel’s Backup Wizard produces the same thing through the browser. Note one warning in cPanel’s own documentation: a full backup created in cPanel cannot be restored from cPanel, only from WHM. So for a self-service move, take a partial backup of the home directory plus a MySQL database backup instead.
Check that the two files are a plausible size. A 40 KB SQL dump for a site with 900 posts means the export failed.
Step 4. Copy everything to the new server
Transfer server to server if you can. Pulling 12 GB of uploads down to a laptop and pushing it back up is slow. It is also where half-finished transfers come from.
# From the NEW server, pull the archive across
mkdir -p ~/migrate
scp [email protected]:~/migrate/*.tar.gz ~/migrate/
scp [email protected]:~/migrate/*.sql    ~/migrate/

# Unpack into the new document root
cd ~/public_html
tar -xzf ~/migrate/files-2026-09-17.tar.gz

# Fix ownership so PHP can write to uploads
chown -R newuser:newuser ~/public_html
find ~/public_html -type d -exec chmod 755 {} ;
find ~/public_html -type f -exec chmod 644 {} ;
If your hosts support it, rsync -avz beats scp for a second pass. It copies only what changed. That is exactly what you want right before the cutover, to catch uploads added since the first copy.
Some control panels can do this for you. WHM’s Transfer Tool moves whole cPanel accounts between servers, including DNS zones. It is the fastest route when both hosts run cPanel and you have root or reseller access on the destination.
Step 5. Import the database and point wp-config.php at it
Create an empty database and a user with full privileges on the new host first, then import.
# On the NEW server
mysql -u newuser -p new_wp_db < ~/migrate/db-2026-09-17.sql

# Or, from the WordPress root with WP-CLI
wp db import ~/migrate/db-2026-09-17.sql
wp db tables | head
wp core verify-checksums
Then edit wp-config.php with the new credentials. Change only these values and leave everything else exactly as it was, especially the authentication salts.
define( 'DB_NAME',     'new_wp_db' );
define( 'DB_USER',     'newuser' );
define( 'DB_PASSWORD', 'the-new-password' );
define( 'DB_HOST',     'localhost' );

$table_prefix = 'wp_';   // must match the prefix in the imported dump
Two traps live in this file. If $table_prefix does not match the prefix inside the dump, WordPress will offer to run a fresh installation over your data. And if you regenerate the salts, every logged-in user is signed out, including you. That is harmless, but alarming in the middle of a cutover.
Step 6. Test on the new server before DNS changes
Add the new server’s IP address to your own machine’s hosts file. Your browser then resolves the live domain to the new server, while the rest of the world still sees the old one.
# macOS and Linux: /etc/hosts
# Windows: C:WindowsSystem32driversetchosts

203.0.113.25   example.com
203.0.113.25   www.example.com
Now walk the site as a visitor. Open the home page, a post, a category archive, search, a form submission, the checkout if you have one, and wp-admin. Watch the browser console for mixed content and 404s on assets. Check the response headers with our HTTP headers checker once the domain is live. For now, use curl -I against the IP directly.
You normally do not need a search-replace, because the domain is not changing. A search-replace rewrites every stored copy of the old URL. Run it only if the URL changes, for example if you tested on a staging hostname first. WP-CLI’s search-replace handles PHP serialized data safely, which a raw SQL UPDATE does not. Serialized data is a packed string that stores the length of each value, so a blind text swap corrupts it. Never do this with a text editor on the dump.
# Always dry-run first and read the report
wp search-replace 'https://staging.example.com' 'https://example.com'
   --all-tables-with-prefix --dry-run

# Then for real, with --precise for serialized-safe PHP replacement
wp search-replace 'https://staging.example.com' 'https://example.com'
   --all-tables-with-prefix --precise

wp cache flush
wp rewrite flush
Remove the hosts file lines when you are finished testing. Forgetting them is why “the site looks fine to me” and “the site is down” happen at the same time.
Step 7. The cutover: change one record, keep both servers live
Freeze publishing first. Run one last rsync of wp-content/uploads, plus one last database export and import, so the new copy is current. Then change the A record to the new IP, and the AAAA record if you have one. Leave MX, TXT and any CNAME for mail or a CDN alone, unless mail is moving too.
# Watch propagation from two independent resolvers
dig +short example.com     @8.8.8.8
dig +short example.com     @1.1.1.1
dig +short www.example.com @9.9.9.9

# Confirm the new server is answering for the real hostname
curl -sI https://example.com | head -n 12
curl -s -o /dev/null -w '%{http_code}n' https://example.com/wp-json/
Expect a 200 on the REST route, and a 301 from http to https once SSL is in place. Track the change from outside your network. Keep an eye on availability with the website down checker for the first hour. Do not cancel the old account, do not delete the old files, and do not let anyone publish on the old copy.
Step 8. SSL, cron and email after the switch
SSL comes first. Most certificate authorities validate over HTTP. That means the certificate for your domain can usually only be issued after DNS points at the new server. On a cPanel host, AutoSSL picks this up within minutes to an hour. On a VPS you run certbot yourself. Until the certificate is live, visitors on HTTPS see a warning, so schedule the cutover when you can watch it. Verify the result with our SSL checker.
Next, cron. WordPress runs scheduled tasks through wp-cron.php on page loads. That is unreliable on a low-traffic site and wasteful on a busy one. The WordPress plugin handbook recommends disabling it and calling the file from the system scheduler instead.
# wp-config.php
define( 'DISABLE_WP_CRON', true );

# crontab -e on the new server
*/5 * * * * curl -s https://example.com/wp-cron.php?doing_wp_cron >/dev/null 2>&1
On a shared host you set the same thing through the panel. Our walkthrough on setting up a cron job in cPanel shows the exact fields. Check afterwards that scheduled posts publish and backups run. Test any e-commerce task too, such as abandoned carts and subscription renewals.
Then email. If MX still points at the old provider, inbound mail is fine until you cancel the account. At that point it stops. Outbound mail sent by PHP from the new server can start landing in spam, because your SPF record still authorizes only the old host’s IP address. Update SPF to include the new server, re-publish DKIM from the new mail service, and send a test message to an address on a different provider.
Common mistakes and how they show up
Mixed content is the most visible. The page loads over HTTPS, but images or scripts are requested over HTTP. The padlock disappears and some assets are blocked. It happens when the old site ran on HTTP and URLs are hard-coded in the database or in a theme file. Fix it with a WP-CLI search-replace from http://example.com to https://example.com, not with a plugin that rewrites output on every request.
A wrong PHP version is the second. A site built for PHP 7.4 on a host running PHP 8.4 can throw fatal errors from one abandoned plugin. Set the new account to the same version the old one ran and confirm the site works. Then step the version up one release at a time, with WP_DEBUG logging on.
Missing cron is the quiet one. Nothing breaks, but scheduled posts stop publishing and backups stop running, and you notice three weeks later. Broken mail is the expensive one, especially for a store sending order confirmations.
Two more are worth checking. A table prefix mismatch in wp-config.php makes WordPress show the installation screen. File ownership left as the old user blocks uploads and updates with a permissions error. Finally, watch the database character set. Importing a utf8mb4 dump into a utf8 database turns emoji and typographic quotes into question marks across every post.
Rollback plan
The TTL is 300 seconds and the old server is untouched, so rolling back is one edit. Change the A record back to the old IP address and wait about 5 minutes. Confirm with dig from two resolvers. You are then back where you started with no data loss, as long as nothing was written to the new copy.
That last condition is why the content freeze matters. If orders or comments arrived on the new server before you rolled back, they exist only there, and going back silently loses them. If that happens, export the new database, roll back, and merge the new rows deliberately rather than restoring blindly.
Keep the old account alive for 7 to 14 days, and keep the pre-migration backup for at least 30 days. Only cancel once analytics, mail and scheduled tasks have all behaved for a full week.
FAQ
How long does a WordPress migration actually take? For a small site with under 2 GB of files, budget 2 to 4 hours of hands-on work. Add the 24-hour wait after lowering the TTL. Large media libraries are dominated by transfer time: 50 GB over a 100 Mbit link is roughly 70 minutes at best.
Do I need a migration plugin? No, but they help if you have no SSH access. Whatever the tool, take a manual database export and file archive first. A plugin that fails halfway through an import leaves a half-written database.
Should I move my domain registration at the same time? No. Change one thing at a time. Move the hosting, confirm it is stable for a week or two, then transfer the domain if you still want to. A registrar transfer can lock the domain for 60 days, and that is not something you want running during a cutover.
Will my search rankings drop? Not if the URLs stay identical and the site keeps returning 200 responses. Rankings move when a migration changes URLs without redirects, or when the new server is slow or intermittently down. Keep the URL structure byte-for-byte, and verify response codes after the move.
What if my site uses a CDN? Update the CDN’s origin to the new IP address before you change the public DNS record, and purge the cache right after the cutover. If the CDN proxies your domain, the public A record may belong to the CDN and never change at all.
Can I migrate from shared hosting to a VPS the same way? Yes, the sequence is identical. The extra work is building the stack before Step 4: web server, PHP-FPM, database, TLS and firewall. You also take over patching afterwards. Our comparison of managed and unmanaged VPS hosting covers what that adds to your month.
Bottom line
Zero-downtime is a process, not a plugin. Lower the TTL a day ahead, build a complete copy, and test it through your hosts file. Cut over in a content freeze, then leave both servers running for a week. The three steps people skip are the TTL, the hosts-file test and the email records. Those three account for most migrations that end in a support ticket.
When you are ready to choose the destination, start from our WordPress hosting section. How we check prices and specs is set out in our editorial policy.
Sources
- developer.wordpress.org/advanced-administration/upgrade/migrating
- wordpress.org/about/requirements
- developer.wordpress.org/cli/commands/db/export
- developer.wordpress.org/cli/commands/search-replace
- developer.wordpress.org/advanced-administration/security/backup/database
- developer.wordpress.org/plugins/cron/hooking-wp-cron-into-the-system-task-scheduler
- docs.cpanel.net/cpanel/files/backup-wizard
- docs.cpanel.net/whm/transfers/transfer-tool
- rfc-editor.org/rfc/rfc1912.txt
- php.net/supported-versions.php
Written and fact-checked by the WebHostingBreak Editorial Team in line with our editorial policy. Prices quoted here come from the provider reviews we maintain and carry the date they were last checked. Spotted an error? Tell us.